Working with MySQL Database using Python
As a data scientist, one should be able to acquire or convert the raw data into actionable information. Once the data is organized, they can proceed further to build the model and play with the data-set to develop the model as per the requirements.
Extracting the data (especially structured) from upstream/downstream applications related databases requires quite a bit of querying skills.
Most commonly used Query Language for data retrieval from the database is ‘SQL’.
MySQL is a freely available open source Relational Database Management System (RDBMS) that uses Structured Query Language (SQL).
In this article, we will look at few SQL commands and how to connect with MySQL using Python package for data acquisition.
To begin with, let’s warm up by trying to understand the basic and important DML (Data Manipulation Language) commands.
- SELECT statement is used to fetch the data from a database table which returns this data in the form of result table called “result-set”.
Syntax: select * from TABLE_NAME;
- WHERE clause is used to specify a condition while accessing the data from a single table or by joining multiple tables. One should use the WHERE clause to filter the records and fetch only the required records.
Syntax: select * from TABLE_NAME where CONDITION;
- JOINS clause is used to combine records from two or more tables in a database. Below are the types of join.
- INNER JOIN: Select records that have matching values in both tables.
- LEFT JOIN: Select records from the left table with matching right table records.
- RIGHT JOIN: Select records from the right table with matching left table records.
- FULL JOIN: Selects all records that match either left or right table records.
Syntax: select * from TABLE_NAME1 as tbl1 join TABLE_NAME2 as tbl2 on tbl1.column_name1 = tbl2.column_name1;
- AND / OR operators are used to combine multiple conditions. These operators provide a means to make multiple comparisons with different operators in the same SQL statement.
AND – Syntax: select * from TABLE_NAME where CONDITION1 AND CONDITION2;
OR – Syntax: select * from TABLE_NAME where CONDITION1 OR CONDITION2;
- GROUP BY clause is used in collaboration with the SELECT statement to arrange identical data into groups. This GROUP BY clause follows the WHERE clause in a SELECT statement.
Syntax: select * from TABLE_NAME where CONDITION group by column1, column2
- ORDER BYclause is used to sort the data in ascending or descending orderbased on one or more columns. By default, it sorts the data in ascending order.
Syntax: select * from TABLE_NAME where CONDITION order by column1, column2 [asc|desc]
- DISTINCT keyword is used to eliminate all the duplicate records and fetch only unique records.
Syntax: select distinct * from TABLE_NAME
Now that you have stretched your arms and legs by learning the commands, let’s dive into the key part where you will see the usage of Python library exclusively designed for SQL.
- Python supports various libraries and “mysql” is one of the important libraries to handle the data.
- We can connect to MySQL Database by using the library’connector’ and acquire or handle the data.
Code Example:
Below is the detailed code explanation:
>>import pandas as pd
# Pandas is an open source Python package that provides numerous tools for data analysis. It also has a variety of methods that can be invoked for data analysis.
>>import mysql.connector
# Python needs a MySQL driver to access the MySQL database. Here we use the driver mysql.connector to connect to the database.
# Importing a library means loading it into the memory and then it’s there for you to work with.
>>conn = mysql.connector.connect(user=’root’, password=’PASSWORD’, host=’localhost’,
database=’DATABASE’, auth_plugin=’mysql_native_password’)
# A connection with the MYSQL server can be established using mysql.connector.connect().
# ‘user’ – The user name used to authenticate with the MySQL server. ‘root‘ is the default username
# ‘password’ – The password to authenticate the user with the MySQL server.
# ‘host’ – Hostname or IP address of the MYSQL server
# ‘auth_plugin’ – Authentication plugin to use.
# ‘mysql_native_password’ –mysql_native_password is the traditional method to authenticate and it is compatible with older drivers.
#If no arguments are given, it uses the already configured or default values
>>myCursor = conn.cursor()
# ‘cursor()’ – Cursors are bound to the connection for the entire lifetime and all the commands are executed in the context of the database session wrapped by the connection
>>myCursor.execute(“select * from TABLENAME”) # Given Query need to be executed
# ‘execute()’ – This method executed the database operation and returns the data as type series.
>>data_list_format = myCursor.fetchall()
# ‘fetchall()’ – This method is used to fetch all the rows from the result set. Result will be in the list format without column names.
>>data_dataframe = pd.DataFrame(data_list_format)
# Converting the data from list to data frame. Here we get the indexing for columns as 0,1,2…
>>column_names = [i[0] for i in myCursor.description]
# To replace column names from 0,1,2… (index) to actual column names (column names of given query from database) in the dataframe we are fetching the Column names from the mycursor.description
>>data_dataframe.columns = column_names
# Replacing the actual column names in the dataframe, where the order of the column names will be same as in the database.
NOTE:
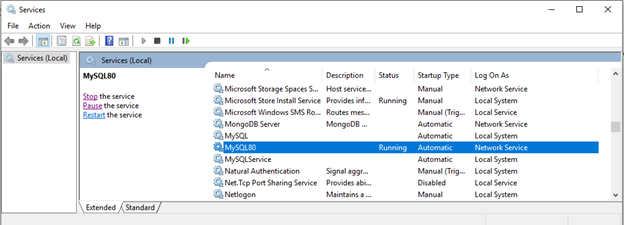
1. In order to execute the code, MySQL service should be running in the system.
2. The respective GITHUB link has the code executed from End-to-End.
Conclusion:
It’s essential for Data Scientists/Machine Learning Engineers to know this process as they indulge in various activities right from Acquiring the data to Deploying the ML code into production. The above knowledge share can help first timers to connect without snooping around the web too much.
..Rahul Gunda
Data Scientist
Datajango